To set up a Wi-Fi router with CenturyLink, follow these steps: First, ensure that your modem is compatible with CenturyLink by checking their list of approved devices. Next, connect your router to the modem using an Ethernet cable.
Power on both the router and modem. Access the router’s settings portal by entering the default IP address in your web browser. Customize your network name and password, and set up a Wi-Fi schedule if desired. Finally, save your changes and test the internet connection.
Remember to contact CenturyLink for assistance if needed. Using a non-CenturyLink modem may require additional specifications and options.
Understanding Centurylink Compatibility
Centurylink is a popular internet service provider, and if you are considering setting up a Wi-Fi router with Centurylink, it is crucial to understand the compatibility requirements. Using a compatible router ensures smooth functionality and optimal performance. In this section, we will explore how to check compatibility with your own router and the Centurylink approved list of routers.
Checking Compatibility With Your Own Router
Before setting up a Wi-Fi router with Centurylink, it is essential to ensure that your router is compatible with their internet service. To check compatibility, follow these steps:
- Access the Centurylink website and navigate to the support section.
- Look for the list of compatible routers or modems.
- Compare the model and specifications of your router with the ones on the approved list.
If your router is on the approved list, you can proceed with the setup process. However, if your router is not compatible, it is recommended to consider purchasing a router from Centurylink’s approved list to ensure a seamless experience.
Centurylink Approved List Of Routers
Centurylink maintains an approved list of routers and modems that are compatible with their DSL internet service. Using a router from their approved list guarantees the best compatibility and performance. To find Centurylink’s approved list of routers, follow these steps:
- Visit the Centurylink website and navigate to the support or equipment section.
- Look for the list of approved routers or modems.
- Review the models and specifications to choose a router that suits your needs.
By selecting a router from the approved list, you can ensure a hassle-free setup and enjoy the full benefits of Centurylink’s internet service. In conclusion, understanding Centurylink compatibility is crucial when setting up a Wi-Fi router. Checking compatibility with your own router and referring to Centurylink’s approved list of routers are essential steps to guaranteeing a successful and optimized setup process. Choose a compatible router and follow the provided instructions to enjoy a reliable and high-speed internet connection with Centurylink.
Getting Started With Centurylink Self-installation Kit
Setting up your Wi-Fi router with Centurylink is a straightforward process, and the first step is to get your hands on the Centurylink Self-installation Kit. This kit contains all the essential components and instructions you need to set up your router and get your wireless internet up and running. In this section, we will explore what’s included in the kit, how to unbox and organize the components, and prepare your workspace for a smooth installation experience.
What’s Included In The Kit
The Centurylink Self-installation Kit comes with everything you need to set up your Wi-Fi router and connect to the internet. Here’s a list of the components you can expect to find in the kit:
| Component | Description |
|---|---|
| Wi-Fi Router | This is the main device that will enable wireless internet connectivity in your home or office. |
| Modem | The modem connects your router to the Centurylink network and allows data to be transmitted over the internet. |
| Power Adapter | This adapter supplies power to your router and modem. |
| Ethernet Cable | An Ethernet cable is used to establish a wired connection between your modem and router, ensuring a stable internet connection. |
With these components, you’ll have everything you need to start setting up your Wi-Fi router and connecting to the internet.
Unboxing And Organizing The Kit Components
Once you have your Centurylink Self-installation Kit in hand, the next step is to unbox and organize the components. Follow these steps to ensure a smooth installation process:
- Find a clean and well-lit workspace where you can unpack and organize the kit components.
- Open the box and carefully remove each component, placing them on your workspace.
- Inspect each component for any signs of damage. If there are any issues, contact Centurylink support for further assistance.
- Take a moment to familiarize yourself with each component and its purpose. This will make the installation process easier.
- Arrange the components in a logical order, keeping cables untangled and easily accessible.
- Ensure that you have a power outlet nearby to connect the power adapter.
By unboxing and organizing the kit components, you’ll have a clear understanding of what you’ll be working with and make the installation process smoother and more efficient.
Connecting And Configuring Your Centurylink Modem
Setting up your Wi-Fi router with Centurylink is an essential step to enjoy seamless internet connectivity in your home or office. In this guide, we’ll walk you through the process of connecting and configuring your Centurylink modem for a hassle-free experience.
Powering Up The Modem
Before you begin, make sure you have the necessary equipment provided by Centurylink. Once you have everything ready, follow these steps to power up your modem:
- Locate the power adapter that came with your modem and plug it into a power outlet.
- Connect the other end of the power adapter to the power port at the back of the modem.
- Power on the modem by pressing the power button or flipping the switch if available.
Connecting The Modem To Dsl
In order to establish an internet connection with Centurylink, you need to connect your modem to a DSL line. Follow these steps:
- Locate the DSL cable provided by Centurylink.
- Connect one end of the DSL cable to the DSL port on the modem.
- Connect the other end of the DSL cable to the phone jack or DSL outlet in your wall.
Checking The Power Light Indicator
Once you have connected the modem to power and DSL, it’s important to check the power light indicator to ensure the modem is functioning correctly. Here’s what you need to do:
- Wait for a few moments after powering up the modem.
- Observe the power light indicator on the front panel of the modem.
- If the power light is solid green, it means the modem is receiving power and is functioning properly. If the light is off or blinking, there may be an issue with the power source or the modem itself. Refer to the user manual or contact Centurylink for further assistance.
Establishing Internet Connectivity
After completing the previous steps, it’s time to establish internet connectivity with Centurylink. Follow these steps:
- Wait for the internet light indicator on the modem to turn solid green. This indicates that your modem has successfully established a connection to the Centurylink network.
- Once the internet light is solid green, you can connect your Wi-Fi router to the modem using an Ethernet cable or via wireless connection, depending on your router’s specifications.
- Refer to your Wi-Fi router’s user manual to configure the settings and connect your devices to the network.
By following these steps, you should now have successfully connected and configured your Centurylink modem for Wi-Fi router usage. Enjoy fast and reliable internet connectivity in your home or office!
Accessing The Centurylink Settings Portal
Introduction To The Settings Portal
Accessing the Centurylink Settings Portal is an important step in setting up your Wi-Fi router. The Settings Portal is a user-friendly interface that allows you to customize and manage your Centurylink internet settings. From here, you can change your network name, set up a password, adjust your Wi-Fi schedule, and much more.
Logging Into The Settings Portal
To access the Centurylink Settings Portal, you need to log in using your Centurylink credentials. Follow these steps:
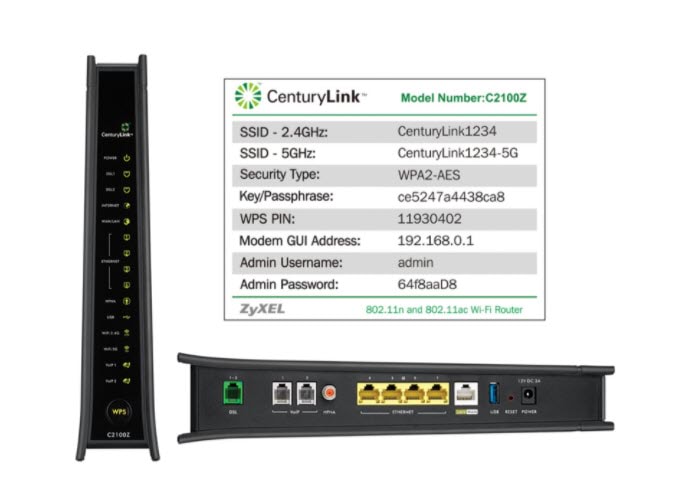
- Open your web browser and go to http://192.168.0.1. This is the default IP address for accessing the Settings Portal.
- You will be prompted to enter your Centurylink username and password. If you haven’t changed these, the default username is usually “admin” and the default password is usually “password”.
- Click the “Login” button to proceed.
Once logged in, you will have access to all the settings and customization options available in the Settings Portal.
Navigating The Portal Dashboard
After logging into the Settings Portal, you will be taken to the dashboard. The dashboard is the central hub where you can navigate and access different settings. Here’s an overview of the main sections and features:
| Section | Description |
|---|---|
| Wireless Settings | Allows you to change your network name (SSID) and set up a password for your Wi-Fi network. |
| Network Settings | Provides options to configure your IP address settings, DNS settings, and other network-related configurations. |
| Advanced Settings | Offers advanced customization options such as port forwarding, firewall settings, and QoS (Quality of Service) settings. |
| Device Status | Displays information about your connected devices, including their IP addresses and network status. |
| Support | Provides access to helpful resources, FAQs, and troubleshooting guides for any issues you may encounter. |
By familiarizing yourself with the layout of the dashboard, you can easily navigate through the different sections and make the necessary changes to customize your Wi-Fi router settings.
Customizing Your Network Settings
After successfully setting up your Wi-Fi router with CenturyLink, the next step is to customize your network settings. This allows you to personalize your network name and password, as well as enable additional security features for enhanced protection. In this section, we will guide you through the process of customizing your network settings.
Network Name And Password Configuration
Your network name, also known as SSID (Service Set Identifier), is the name that appears when you search for available Wi-Fi networks on your devices. It is important to choose a unique and easily recognizable network name, as this will help you identify your network amidst others in your vicinity.
To customize your network name:
- Access your router’s settings by typing its IP address into your web browser’s address bar.
- Enter the login credentials provided by CenturyLink. If you haven’t changed them, the default username and password should be printed on the back of your router.
- Navigate to the Wi-Fi settings section and locate the Network Name (SSID) field.
- Enter your desired network name.
- Save the changes and wait for your router to restart.
Once you have customized your network name, it’s time to set a strong and secure password to prevent unauthorized access to your network.
Choosing A Secure Password
A strong password is vital for safeguarding your Wi-Fi network. It should be a combination of uppercase and lowercase letters, numbers, and special characters. Avoid using dictionary words or easily guessable information, such as your name or address.
To choose a secure password:
- Access your router’s settings using the IP address and login credentials mentioned earlier.
- Navigate to the Wi-Fi settings section and locate the Password field.
- Enter your desired password, ensuring it meets the recommended security standards.
- Save the changes and wait for your router to restart.
Remember to write down your password and keep it in a safe place. You may also consider periodically changing your password for added security.
Enabling Wi-fi Schedule For Enhanced Security
Another important customization option to enhance your network security is enabling a Wi-Fi schedule. This allows you to set specific times for when your Wi-Fi network is available for use.
To enable Wi-Fi schedule:
- Access your router’s settings using the IP address and login credentials mentioned earlier.
- Navigate to the Wi-Fi schedule settings section.
- Specify the days and times during which you want your Wi-Fi network to be active.
- Save the changes and wait for your router to restart.
By enabling Wi-Fi schedule, you can prevent unauthorized access during certain hours, enhancing the overall security of your network.
Customizing your network settings not only allows you to personalize your network but also strengthens its security. By choosing a unique network name, setting a strong password, and enabling Wi-Fi schedule, you can ensure a safer and more efficient Wi-Fi experience.

Frequently Asked Questions For How To Set Up A Wi-fi Router With Centurylink?
Can I Use My Own Router With Centurylink?
Yes, you can use your own router with CenturyLink. To ensure compatibility and setup requirements, chat with a CenturyLink agent for guidance. Using a non-CenturyLink modem may require assistance to connect properly.
Can I Use Any Wifi Router With Centurylink?
Yes, you can use any WiFi router with CenturyLink. However, it is important to check for compatibility and setup requirements. CenturyLink provides a list of approved devices to ensure the best compatibility. You can also set up CenturyLink yourself with a self-install kit provided by the company.
If you are experiencing connectivity issues, double-check that you are using the correct network and password.
Can You Set Up Centurylink By Yourself?
Yes, CenturyLink provides a self-install kit for you to set up your service yourself.
Why Is My Centurylink Router Not Connecting To The Internet?
Make sure you’re using the correct network and password. If you haven’t changed anything, use the details printed on your modem label.
Can I Use My Own Router With Centurylink?
Yes, you can use your own modem with CenturyLink, but make sure to check for compatibility and setup requirements first.
Can I Use Any Wifi Router With Centurylink?
Not all routers and modems are compatible with CenturyLink’s DSL internet. It’s best to choose from CenturyLink’s approved list of devices for optimal compatibility.
Can You Set Up Centurylink By Yourself?
Yes, CenturyLink provides a self-installation kit that includes everything you need to set up the internet service on your own.
Why Is My Centurylink Router Not Connecting To The Internet?
There are two common causes for connection issues – using the wrong network or entering the wrong password. Ensure you are connecting to the right network and using the correct password.
How Do I Customize My Centurylink Network Name And Password?
To customize your network name and password for CenturyLink, log into the settings portal provided by CenturyLink and follow the instructions to make the desired changes.
What If I Haven’t Received My Centurylink Self-installation Kit?
If you haven’t received your self-installation kit from CenturyLink, it’s best to contact their customer support for assistance in resolving the issue.
Final Words
Setting up a Wi-Fi router with CenturyLink is a simple process that can enhance your internet connectivity. By following the step-by-step instructions and utilizing CenturyLink’s approved list of devices, you can ensure the best compatibility. Whether you choose to use your own router or opt for CenturyLink’s self-install kit, the key is to connect with the right network and password.
With this guide, you can easily set up your Wi-Fi router and enjoy reliable internet access in your home or office.
Leave a Reply