Are you looking to configure VLANs but not sure where to start? Well, you’re in the right place! In this article, we’ll guide you through the process of VLAN configuration, step by step. Whether you’re a networking enthusiast or a beginner, this article will provide you with clear instructions on how to set up and configure VLANs effectively. So, let’s dive into the world of VLAN configuration and explore the ins and outs of how to VLAN configuration.

How to Configure VLAN: A Comprehensive Guide
Introduction
Configuring VLANs (Virtual Local Area Networks) is an essential skill for network administrators and IT professionals. VLANs allow you to create virtual networks within a physical network, improving security, bandwidth management, and network efficiency. In this guide, we will delve into the intricacies of VLAN configuration, providing step-by-step instructions and detailed explanations to help you master this important networking concept.
Understanding VLANs
Before diving into the configuration process, let’s first understand what VLANs are and how they work. VLANs are logical networks created within a physical network infrastructure to segment traffic and improve network management. By assigning specific ports or devices to a VLAN, you can control how data flows and enforce security boundaries.
Here are some key concepts to grasp about VLANs:
1. VLAN Tagging: VLAN frames include a VLAN tag that identifies the VLAN to which the frame belongs. This tag enables switches to differentiate between different VLANs.
2. Trunk Ports: Trunk ports are used to carry multiple VLAN traffic between switches. They allow communication between VLANs by tagging the frames with the appropriate VLAN IDs.
3. Access Ports: Access ports are used to connect end devices to a specific VLAN. Traffic received on an access port is automatically assigned to the VLAN associated with that port.
4. VLAN Membership: Devices can be members of one or more VLANs, depending on the network’s needs and configurations. This allows you to group devices together based on different criteria, such as departments, locations, or security levels.
No products found.
Step-by-Step VLAN Configuration Process
Now that we have a solid understanding of VLANs, let’s explore the step-by-step process of configuring VLANs on a network switch. In this guide, we will focus on Cisco switches, as they are widely used in enterprise networks. However, the core concepts discussed here apply to other switches as well.
Step 1: Accessing the Switch CLI
To begin the configuration process, you need to access the Command Line Interface (CLI) of the switch. Follow these steps:
1. Connect to the switch using a console cable or through a remote connection tool like SSH.
2. Log in to the switch using valid credentials (username and password).
3. Once logged in, you will be presented with the switch’s CLI prompt.
Step 2: Configuring VLANs
Now that you have access to the switch CLI, you can start configuring VLANs. Follow these steps:
1. Enter the global configuration mode by typing the command: configure terminal.
2. Create a VLAN by specifying a VLAN ID and a name using the command: vlan [vlan-id] followed by name [vlan-name]. For example, to create VLAN 10 named “Sales,” type: vlan 10 followed by name Sales.
3. Repeat the previous step to create additional VLANs as needed.
Step 3: Assigning Ports to VLANs
Now that VLANs are created, you need to assign ports to the appropriate VLANs. Follow these steps:
1. Enter the interface configuration mode for the desired port using the command: interface [interface-name]. For example, to configure GigabitEthernet 0/1, type: interface GigabitEthernet 0/1.
2. Set the port as an access port by typing the command: switchport mode access.
3. Assign the desired VLAN to the port using the command: switchport access vlan [vlan-id]. For example, to assign VLAN 10 to the port, type: switchport access vlan 10.
4. Repeat the previous steps for each port you want to assign to a specific VLAN.
Step 4: Configuring Trunk Ports
If you need to carry VLAN traffic between switches, you’ll need to configure trunk ports. Follow these steps:
1. Enter the interface configuration mode for the desired port using the command: interface [interface-name].
2. Set the port as a trunk port by typing the command: switchport mode trunk.
3. Optionally, you can limit the allowed VLANs on the trunk port using the command: switchport trunk allowed vlan [vlan-list]. For example, to allow VLANs 10, 20, and 30 on the trunk port, type: switchport trunk allowed vlan 10,20,30.
4. Repeat the previous steps for each trunk port that needs to carry VLAN traffic.
Step 5: Verifying VLAN Configuration
After configuring VLANs and assigning ports, it is important to verify the configuration to ensure everything is properly set up. Here are some useful commands for verification:
1. show vlan brief: Displays a brief summary of all VLANs configured on the switch, including VLAN IDs and names.
2. show interfaces [interface-name] switchport: Provides detailed information about a specific interface, including VLAN assignments.
3. show interfaces trunk: Shows information about trunk ports, including allowed VLANs.
4. show mac-address-table: Displays the MAC address table, which indicates which devices are associated with each VLAN.
By using these commands, you can validate that your VLAN configuration is functioning as intended.
Troubleshooting VLAN Configuration
Sometimes, issues may arise during or after VLAN configuration. Here are a few common troubleshooting steps to help you resolve problems:
1. Verify VLAN assignments: Double-check that each port is assigned to the correct VLAN.
2. Check trunk port configuration: Ensure that trunk ports are correctly configured, including allowed VLANs, encapsulation protocols (if applicable), and native VLAN settings.
3. Check connectivity: Verify physical connectivity and make sure cables are properly connected.
4. Diagnose VLAN-related issues: Use network monitoring tools or packet captures to analyze network traffic and identify any VLAN-related problems.
5. Update switch firmware: If all else fails, check for firmware updates for your switch model and apply them if available. Sometimes, bugs or compatibility issues can cause VLAN configuration problems.
Configuring VLANs is a crucial skill for network administrators, as it allows for efficient network management and improved security. In this comprehensive guide, we have explored the steps involved in VLAN configuration, from creating VLANs to assigning ports and configuring trunk links. By following the detailed instructions provided, you can confidently configure VLANs on your network switches and optimize your network infrastructure.
Now that you have a solid understanding of VLAN configuration, you are well-equipped to take control of your network’s traffic segmentation and improve overall network performance and security.
Remember, VLAN configuration may vary slightly depending on the switch manufacturer and model, so always refer to the specific documentation for your equipment when performing VLAN configurations.
FAQs
1. What is the purpose of VLANs?
VLANs enable network administrators to logically segment a physical network into multiple virtual networks, improving security, traffic management, and network efficiency.
2. Can VLANs span multiple switches?
Yes, VLANs can span multiple switches through the use of trunk ports, which carry VLAN-tagged frames between switches.
3. How many VLANs can be created on a switch?
The number of VLANs that can be created depends on the switch model and its capabilities. Some switches support a maximum of 4096 VLANs.
4. Can devices in different VLANs communicate with each other?
By default, devices in different VLANs cannot communicate directly with each other. However, you can configure inter-VLAN routing to allow communication between VLANs if needed.
5. Can VLANs improve network security?
Yes, VLANs help improve network security by isolating traffic and limiting access between different groups of devices.
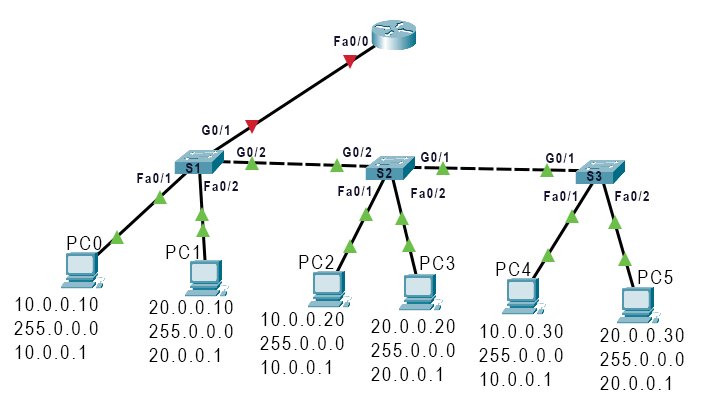
Simple VLAN Configuration Cisco Packet Tracer
Frequently Asked Questions
What is a VLAN and how does it work?
A VLAN (Virtual Local Area Network) is a logical grouping of devices on a network, even if they are physically located in different places. It enables network administrators to segment the network into smaller, isolated networks, regardless of the physical infrastructure. VLANs operate by assigning specific ports on network switches to a VLAN, allowing devices connected to these ports to communicate with each other while being isolated from devices on other VLANs.
How do I configure a VLAN on a network switch?
To configure a VLAN on a network switch, follow these steps:
- Access the switch’s configuration interface through a web browser or command-line interface.
- Create the VLAN by specifying a VLAN ID and name.
- Assign ports to the VLAN, either individually or in groups.
- Configure VLAN settings, such as IP addressing and VLAN trunking, if necessary.
- Apply the configuration changes and save them.
What is VLAN tagging and why is it important?
VLAN tagging is the process of adding additional information (tag) to Ethernet frames, which identifies the VLAN that the frame belongs to. It is important because it allows switches and other networking devices to differentiate between VLANs when transmitting and receiving data. Tags contain information such as VLAN IDs and priority levels, ensuring proper routing and isolation of network traffic.
How can I enable inter-VLAN routing for communication between VLANs?
To enable inter-VLAN routing for communication between VLANs, you have a few options:
- Configure a Layer 3 switch that supports routing capabilities.
- Use a router with multiple interfaces, each connected to a different VLAN.
- Implement a software-based router or firewall that supports VLAN routing.
Regardless of the method chosen, you will need to configure routing interfaces, IP addressing, and routing protocols as necessary.
Can a device belong to multiple VLANs simultaneously?
No, a device can only belong to one VLAN at a time. However, you can configure VLAN trunking on a switch to allow a single network interface to carry traffic for multiple VLANs. This is done by tagging each Ethernet frame with a VLAN tag, allowing devices on either end of the trunk link to differentiate between VLANs.
No products found.
Final Thoughts
To recap, VLAN configuration is a vital aspect of network management. It allows for the segmentation of a network, improving security and enhancing performance. By assigning devices to specific VLANs based on their function or user group, administrators can effectively control traffic flow and isolate potential security threats. Proper VLAN configuration involves steps such as identifying VLAN requirements, creating VLANs, assigning ports, and configuring trunk links between switches. Understanding how to VLAN configuration enables network administrators to create a flexible and scalable network infrastructure that meets the unique needs of their organization.
Leave a Reply